Pages

Latest Video

Monday, June 13, 2011

How to Disable Tag Suggestion Feature in Facebook

 FacebookIf you use Facebook often and do not want its Tag Suggestion feature, you may disable it yourself or may contact a computer repair service for help. When the Facebook user uploads a photo in his/her profile, the social networking site enables the tag suggestion. The feature recognizes the faces of your friends in the picture and automatically tags the photos. The feature is turned on for all Facebook users by default. For disabling the feature in your Facebook account, follow some simple steps.

• Step 1: Go to the Facebook website and login to your account.
• Step 2: Now click on the tab labeled Account and go to Privacy Settings link which is available at the top right side corner.
• Step 3: On the Privacy Settings page, the Facebook user must click on the link that is called Customize Settings; this link is located at the bottom left side.
• Step 4: Now the user must click on the button called Edit Settings which is visible against the option Suggest photos of me to friends.
• Step 5: A window will pop up and the user has to choose the Disable option and then click Okay button for saving settings.

This will stop you from being automatically tagged in your friends’ uploaded photos. If you are not confident in doing this yourself, get the services of a remote PC support provider.
Wednesday, June 8, 2011

How to Share Your Libraries in Windows 7

Windows 7If you are a Windows 7 user, you may choose to share your libraries with the other network users. The operating system enables the users to share libraries with read/write access or read only access. There are steps to achieving the task and if you are not confident on achieving the task, then seek the services of an online technical support provider.

• Step 1: The user must open Windows Explorer.

• Step 2: Now you must choose a library that you want to share with the other users who are on the network.

• Step 3: In the toolbar, the user must click on Share With and then select Homegroup (Read) or maybe Homegroup (Read/Write). When you choose Homegroup (Read), the other users on the network will gain read only access to the files on your chosen library. Now if you select Homegroup (Read/Write), the other users on network can enjoy both read and write access to the files in the library that has been selected.

If in future you do not want the particular library files to be accessed by the other users on the network, you have to un-share the library. In this case, the user must follow the aforementioned steps and then choose Nobody option from the menu. There are many remote PC repair services that can help you with this and other computer related issues.

Wednesday, June 1, 2011

Steps to Show Games as Menu in Start Menu of Windows 7

Do you love playing games on your PC? Do you switch on your PC mostly for playing your favorite games? Well, if you have such an addiction, wouldn’t it be good to have the games shown as menu in the Start menu? You would then get direct access to your games and start playing. All Windows 7 operating system users can choose to go right to the Games category for running the games fast. Gone are the days when users had to go to the Games folder and choose a game for playing.

For showing games as menu in start menu, you have to follow some steps or seek the services of an online technical support provider.

• Step 1: Right click on the Start menu and choose “Properties” from the menu that appears.

• Step 2: Now the user has to choose the tab labeled “Start Menu”, in case that tab is not already selected.

• Step 3: Look for the button called “Customize” under the Start Menu tab and click on it.

• Step 4: Now scroll down the list of options and select the option “Display as menu” which is found under the Games category.

• Step 5: Now click on “OK” for saving the settings.

If you still have problems, contact a remote PC support provider for assistance immediately.

Friday, May 27, 2011

Turn Off Windows Defender in Windows 7: Lean How

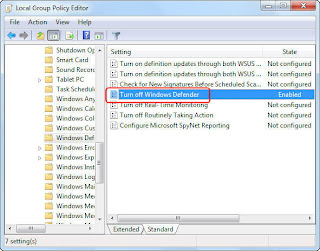
Local Group Policy EditorIf you are using Windows 7 operating system, know that Windows Defender is pre-installed in the operating system. Windows Defender is actually a utility that is used for scanning and removing spyware as well as malware that may get into Windows from the internet. However, users often feel the need to disable Windows Defender as they do not want it to run along with other installed anti-spyware programs. You may turn off the utility yourself or contact a Windows repair service for assistance.

• Step 1: Press the Windows key and the R key together for opening the Run dialog.

• Step 2: Now type “gpedit.msc” in the dialog box and then hit the Enter key.

• Step 3: When the Local Group Policy Editor opens, the user must navigate to “Computer Configuration” and then go to “Administrative Templates”.

• Step 4: Now the user clicks on Windows Components and then goes to Windows Defender.

• Step 5: On the right side pane, the user will find a setting labeled “Turn Off Windows Defender”. The user has to click on this setting and choose “Enabled” and then click “OK”.

• Step 6: Finally the user must close the Local Group Policy Editor window.

These steps should help you turn off Windows Defender; if you still have problems, contact an online technical support service immediately.

Tuesday, May 24, 2011

Steps to Change the Sound Schemes in Windows 7

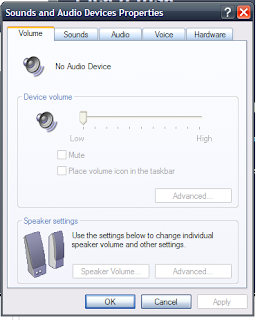
Sound SchemesWhen you are using the Windows 7 operating system, know that you may change the sound schemes, if you deem necessary. When the user logs on to windows and opens a window or closes a window, or maybe some error has occurred, there is a sound played by Windows. Windows 7 comes with several sound sets that the user may change accordingly to his/her choice. There are many steps that the user needs to follow for changing the sound schemes, or he/she may also seek the services of a remote PC support provider.
• Step 1: In the system tray, identify the speaker icon and right click on it.

• Step 2: Now the user must select the “sounds” option from the right click menu

• Step 3: In the sound window that is open, the user has the option to choose a sound scheme from the drop down list

• Step 4: After the user selects a sound scheme, the sounds may be tested for different events by using the “Test” button. Make sure you select an event in the event list and then click the “Test” button

• Step 5: When you are satisfied, click on “OK” for saving the settings. If you do not want to have any sounds, you may select the “No Sounds” scheme.

In case you are having problems, contact an online computer repair company for assistance.

Thursday, May 19, 2011

How to Add a Folder to Favorites Group in Windows 7

Favorites Group Folder in Windows 7If you feel the need of a folder often when working on your Windows 7 operating system, you may choose to have the folder in the Favorites groups, so that you may access it easily without wasting anytime in locating it every time. The Favorites group is visible at the top right side navigation pane of the Windows Explorer. Follow the steps or get a computer repair service to do the task for you.

• Step 1: Open the Windows Explorer and then navigate to the folder that you want to add to the Favorites group and select it.

• Step 2: Now you have to drag the selected folder to the Favorites group

• Step 3: After you have dragged the file, you will find a tooltip appear that says “Create link in Favorites”. As soon as you see the tooltip, release the mouse button and you will find the link created in the Favorites group.

If you think that you do not want to access the folder frequently, you can also remove the link. In this case, under the Favorites group you have to right click on the folder link and then select the “Remove” option. If you find following the steps complex and have issues, you can immediately contact an online technical support service.

Sunday, May 8, 2011

How to Rebuild Icon Cache in Windows XP

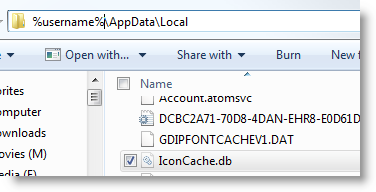
If you are using the Windows XP operating system, know that sometimes the icon cache in the available in Windows gets corrupt. Know that whenever an icon is accessed by Windows, the icon is cached for reference in future. Afterwards, the image gets read from the cache instead of being read from the icon definition itself. By default the icon cache is able to store 500 icons. When the icon cache gets corrupted in Windows, you find the wrong icons displayed for the many file types.

This issue can be solved by restarting the computer in most of the cases. The issue can be solved by also not having to restart your computer system. There are some steps that you have to follow or you may also choose to contact a remote PC support provider for help.

• Step 1: Press the Windows logo key and the “R” alphabet key on your keyboard to open the Run dialog.

• Step 2: Now type “cmd” on the Run dialog box and then hit the Enter key. This will open the command prompt window.

• Step 3: In the command prompt window, you have to type some commands. Note that you have to press enter after typing each line. You have to type the following:
taskkill /f /im explorer.exe attrib -H "%userprofile%\Local Settings\Application Data\IconCache.db" del "%userprofile%\Local Settings\Application Data\IconCache.db" explorer.exe The aforementioned steps should rebuild the icons cache and also restart the Windows Explorer.
If you still face problems with the icons, you may seek online computer repair for assistance.

Thursday, April 28, 2011

Steps to Hiding the Taskbar in Windows XP Automatically

Often while working on your Windows XP computer system, you may feel the need of getting more screen space, this is when you want to hide the Windows taskbar till you need it. The Windows CP system can be configured for automatically hiding the taskbar until it is required. The Auto-hide option can help in making the Windows taskbar disappear when not required. This will enable in giving the application you have open a lot more available screen space.

For turning off the Auto-hide option, you must follow some simple steps or look for online tech support.

Hiding the Taskbar in Windows XP• Step 1: Right-click on the taskbar and choose the “Properties” option from the menu that appears. This will open up the “Taskbar and Start Menu Properties” window.

• Step 2: Click on the “Taskbar” tab and then check the box that has been labeled “Auto-hide the Taskbar”

• Step 3: You also need to ensure that the box labeled “Keep the taskbar on top of other windows” is checked.

• Step 4: Now click on “OK” for saving the changes and then exit the properties window.

This should enable the taskbar to disappear. If you want the taskbar to be visible, you must move your mouse cursor to the bottom of the screen. If you do not want to hide the taskbar anymore, simply follow the above mentioned steps, and just uncheck the “Auto-hide the Taskbar” box. If you are still facing problems, you may contact an online computer repair service.

Thursday, April 21, 2011

How to Disable the Windows XP Error Reporting Feature

What do you think the error report sending feature is for? This is a feature that enables Microsoft in production of better stable software in future. The individual can decide if he/she wants to send the error reports or not. There are several steps to be followed if error reporting feature has to be disabled.

Disable Windows XP Error Reporting Feature• Step 1: Go to the Start menu and choose the “Properties” option for opening the System Properties window. You may also right click on the My Computer icon available on your desktop

Step 2: Click on the “Advanced” tab

• Step 3: Now click on the button which is labeled as “Error Reporting”. You can find this button at the bottom right side of the System Properties window. You will get the Error Reporting window.

• Step 4: Now choose the “Disable error reporting” option. You may also tick the check box that says “But notify me when critical errors occur”

• Step 5: Click on OK for exiting the “Error reporting window” and then click on OK for a second time to exit the System Properties.

If you want to enable the error reporting feature later, you have to follow the same afore-mentioned steps and select “Enable error reporting” option instead of “Disable error reporting” option. If problems persist, you need to contact an online computer repair service for tech support.

Thursday, April 14, 2011

Tips to Install Driver for Updating Printer

If the printer that you are using is not functioning properly and needs the driver software to work properly, you have to download and install the latest driver for your device. Incompatible, corrupted and outdated printer drivers get the communication between the printer and the computer disrupted. You may have upgraded from one version of Windows to another, your printer might not be working because the current printer driver is not compatible with the upgraded version.

Updating Printer
You may use Windows Update for installing a driver. Set the Windows Update to download automatically as well as install the recommended updates. Search for a good driver on the website of the manufacturer. This step is essential only if your printer did not come with software that installs a driver or the Windows Update cannot get a driver for your printer.

• Step 1: Click on Start menu and in the search box type Update. Click Windows Update from the list of results.

• Step 2: Click on “Check for Updates” in the left pane. If there are available updates, make sure you click on the links for more information on each updates.

• Step 3: Look for updates for your printer on the “Select the updates you want to install” page. Click the driver that you want to install and then click on OK.

• Step 4: On the Windows Update page click on Install Updates. Type the password if you are prompted for an administrator password.

If you still face problems, contact an online PC repair service for technical support.

Wednesday, April 6, 2011

How to Burn a CD in Mac OS X

Burn a CD in Mac OS XIf you are using a Mac OS X and want to compile a CD that has your favorite music and videos, you may do so. You just need to follow certain simple steps in accomplishing your task. Note that the formats of a computer CD and audio CD are different. The following steps will create a CD that can be played on the computer system, and will not function in an audio CD player.

• Step 1: Firstly, you have to insert a blank CD in the CD drive

• Step 2: The Mac OS X will prompt you the application for which it has to be run. You need to enter your desired label for the CD. Now select the Finder application and then click on “OK”

• Step 3: Now the blank CD will get mounted by your hard drive. You have to drag and drop the folders as well as the files you want to want to add to the blank CD

• Step 4: The next step will be to click on the circle icon with triangles; the icon looks similar to a radiation warning pool. You can set the speed for burning the CD here after getting the prompt.

• Step 5: Now click on OK for beginning the CD burning process.

If you are facing issues with the aforementioned steps, you may contact a computer repair service for online PC support.

Sunday, April 3, 2011

How to Solve Sound Problems in Dell ?

If you have a Dell system and find that the sound or the speakers are not functioning properly, you have to work to set things right. Following are the steps to resolve the problem.

•Step 1: Certain MP3 players have volume control overriding the Windows® volume setting. Make sure you have not turned the player volume low or totally off while listening to the MP3 songs.

•Step 2: Ensure that you check the speaker cable connections. If you have a sound card, the speakers should be connected to the card.

•Step 3: Check to see if the speakers have volume controls, then adjust the bass, the volume, and the treble. This will help in eliminating the distortion.

•Step 4: Click on the speaker icon in the lower right side corner of the screen for adjusting the windows volume control.

•Step 5: You can also check if the electric outlet is working properly; test with another device like a lamp.

•Step 6: You may also try eliminating possible interference. You can switch off the fluorescent lights, fans and halogen lights.

•Step 7: Run the speaker diagnostics, if the speaker system has one.

•Step 8: You may also try reinstalling the audio or the sound driver for effective results.

•Step 9: Now check the device option setting. Enter the system setup and make sure that the Sound option under Integrated Devices tab is set ‘ON’. Now exit system setup and restart your machine.

If you are still facing problems with sound, you can contact a Dell support service for computer repair.

Tuesday, March 29, 2011

How to Avoid Phishing

Phishing is the scam that refers to sending out fake emails for deriving financial and private information from the recipients. If you click on any link, you will be taken to a false website and asked for certain information; this information will be later recorded for logging into your bank account or credit card for the purpose of stealing your money.

If you want to avoid phishing, there are certain steps that you need to follow.

•Step 1: Make sure that your antivirus is updated; this will help a lot in decreasing the phishing attacks considerably.

•Step 2: Avoid clicking on any hyperlinks provided in emails, especially when it is from unknown sources.

•Step 3: For minimizing the phishing attacks, you must have the anti-spam software installed.

•Step 4: Verify the “https://”, make sure this is present in the address bar rather than http://. Also ensure that the webpage is truly encrypted.

•Step 5: You can use a desktop and network firewall. Once the firewall is incorporated, it will be able to prevent the malicious code from getting into your system and hijacking your browser.

•Step 6: you may configure the hosts file to read only mode for alleviating the problem of phishing.

In case you are still facing problems, you may contact a remote computer repair provider for PC repair.

Friday, March 25, 2011

How to Keep Your Inbox Zero ?

If you want to stop your inbox from clogging, you can remove the clutter and bring down your inbox to having no emails at all. You will find that a bulk of the mails are useless, which you do not require. There are also mails which require instant attention and mails which may be of interest at a later stage. Ensure that you maintain your inbox well. There are certain simple steps that you must follow for helping reduce the burden from your inbox.

•Step 1: Decide on the time you can allot for checking emails every day. Note that the emails must be processed during this specified time.

•Step 2: You can set up filters for effective inbox management. The filters can do away with the unwanted messages in your inbox.

•Step 3: Have a scheduled time period on a daily basis to act on the emails you should and then process your inbox to zero .

•Step 4: You can have folders for unimportant email messages like online registration forms, newsletters, as well as acknowledgments.

•Step 5: Keep checking the emails everyday and delete emails that are unimportant. Place the important mails in a separate folder so that you can access them readily whenever you want to.

If you still require help for keeping your inbox clutter free, you can ask for the computer repair services UK for tech support.

Tuesday, March 22, 2011

How to Send Bulk Emails

What do you understand by bulk emails? This is actually referred to the system of sending an email to many recipients at the same time. The number of recipients in this case may vary. This is a concept which is specially followed by the many companies and business groups for the purpose of marketing their products and services. For sending effective bulk emails, you need to follow certain steps.

•Step 1: Check how you are writing your email. Make sure you write by including all the details that your recipients require knowing.
•Step 2: There should be the right subject line for sending the bulk email. This subject line should be related to your message. Do not use subject lines that will make the recipients block the email message due to spam.
•Step 3: For keeping your bulk mail separate from the spam mails, you need to have accurate headers.
•Step 4: After you have the appropriate email message for sending as bulk email, make sure that you fill the fields that are marked as BCC. This will send your bulk email to a number of recipients and at the same time keep the email addresses of them private. All the recipients will get to see only their email address and not the other recipients’ addresses.

If you are still not being able to send the bulk mail, contact the computer repair services UK for tech support.

Wednesday, March 16, 2011

How to Set Virtual Memory in Windows XP

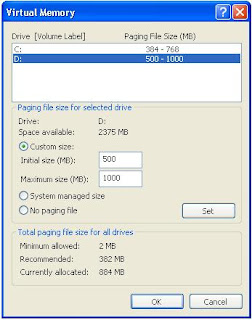
If you have the right amount of virtual memory in your computer system, your Windows XP operating system’s performance will be enhanced. Note that choosing unacceptable values will make your computer slow down. The data that is used by your computer frequently is stored in the Main memory, but usually the memory space is too less to store all the data that used by your machine. This is where the Virtual Memory is required. If you get the message ‘Virtual Memory minimum too low’, you have to follow some steps to fix the issue.

•Step 1: Go to Control Panel

•Step 2: Access System and then go to Advanced

•Step 3: You have to click on Settings under the Performance category

•Step 4: You have to choose the Advanced tab again

•Step 5: In the last category, which is Virtual Memory, click on Change for changing the values.

You will get all your partitions in a list. You have to specify the space virtual memory for each partition. Choose ‘Custom Size’ for the partition where you want to make virtual memory. Make sure that you specify the maximum and initial memory. Put a value that is equal to your RAM memory for the initial size and for the maximum size, put a value that is double your RAM memory.

In case you still have Virtual Memory problems, you have to contact a remote computer repair provider for assistance.

Thursday, March 10, 2011

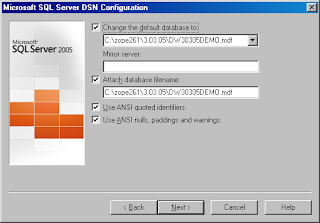
How to Open a .MDF File

The .MDF extension format is required when a backup of the data is made on the DVDs or the CDs. The .MDF files can be used like an actual disk, and you do not have to insert the disk into the computer system again.

•Step 1: Download the .MDF file openers. You may use the trial versions or the free software downloads.

•Step 2: After you finish downloading, you may install the .MDF file opener. You may wish to disable the option of including in the tool bar the .MDF file opener during installation. If you are not requiring it often, there is no need to clutter your tool bar.

•Step 3: Go to the .MDF file and in the file dialog box click on open. The appropriate disk image will be loaded by the .MDF file opener. The software will ask you to confirm if that is the file you want to convert.

•Step 4: You may also drag the .MDF file in the application window for opening the .MDF file.

•Step 5: The .MDF file opener can also help you copy a file. With the .MDF file opener open, you will also be able to drag and drop the folder into the file opener for copying the desired files.

•Step 6: Add the files in an existing .MDF folder. You may access the file menu to go to ‘Add File’ for selecting the file that you want to add. You may click on Open for returning to the original menu.

If you still face problems in opening .MDF files, you can contact a remote computer repair provider for assistance.

Thursday, March 3, 2011

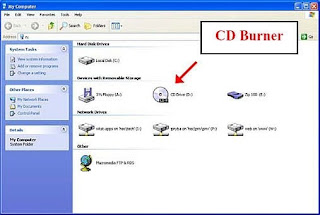
How to Show CD Drive Letter in My Computer ?

When you start your machine, you will find that Windows detects the CD-ROM drive. The green led blinks to show that CD-ROM drive power is on. However, you may find that there is no CD drive letter or icon in the Windows Explorer or My Computer for you to use. If you can relate to this annoying situation, know what you need to do. You may try out the following steps if you are using Windows 95/98/98SE/ME operating systems. These steps can also work with other versions.

Step 1: Start your system and then right click on the My Computer icon.

• Step 2: You will get a drop down menu, where you need to select the Properties icon. Now the system properties window will open for you.

• Step 3: Now click on the Device Manager tab

• Step 4: You have to go to the ‘hard disk controllers’ option and click the small + symbol that is located to its left.

• Step 5: Next click on Intel/Via ‘PCI bus master IDE controller’

• Step 6: At the bottom of the system properties window, you will find the Properties button, click on it.

• Step 7: Go to Settings and now change the Dual IDE channel setting to ‘Both IDE Channels Enabled’

• Step 8: Now hot OK and restart your machine

• Step 9: The problem should be solved now.

If you are still having problems, you may call remote computer repair service for tech support.

Sunday, February 27, 2011

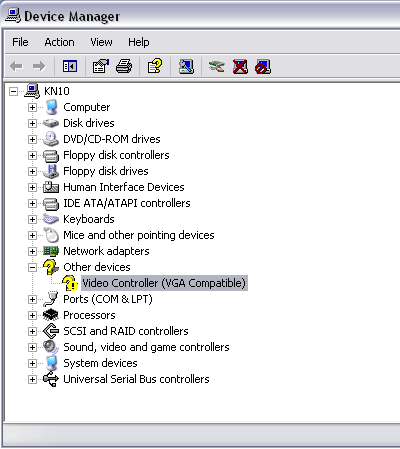
How to Fix Video Driver Errors

A majority of video driver errors occur owing to the fact that the video driver itself is below standard. Computer users, who have met with these problems, usually use a beta version of the driver and upgrade to the release version for solving the issues. In case the current release is causing problems, it will be wiser to use an earlier release version.

In case the problems remain with you changing the video driver versions, there are other steps you can follow.


•Step 1: Check if the power supply in your PC is causing problems; the video cards that support multiple displays use a lot of electricity. Avoid getting a video card that needs its own separate power connector and must be considered much of a drain on the power supply.

•Step 2: Also find out if the card is defective. If you replace your present video card with another card, it might not work. Swapping your video card with a card that does not use an external power connector rules out the power supply draining problems.

•Step 3: A failing motherboard can also be the source to all video driver problems. You may try fixing this motherboard problem, only when the other two steps have been explored to no avail.

If problems persist and the above mentioned steps have not been able to help you, you may try contacting a remote computer repair company for tech support.

Tuesday, February 22, 2011

How to Remove Yahoo Toolbar

Do you have a Yahoo toolbar and don’t know how you got it? Do you want to remove it? Well, removing Yahoo toolbar is possible. The Yahoo toolbar has probably appeared when you downloaded something that was sponsored by Yahoo! or some other applications. If you are using Microsoft Internet Explorer versions 4.0 through 5.5 or if your operating system is Windows 95 or higher, it will be possible to get rid of the toolbar yourself.

•Step 1: Click ‘View’ from the Internet Explorer toolbar and then check if there is a listing for ‘Toolbars’; if you find it click on it.

•Step 2: If Yahoo! toolbar is mentioned, it will be possible to delete the program. In case it is not available, you have to delete the toolbar from the toolbar itself.

•Step 3: On the Yahoo! Companion toolbar, you will find the option Edit; click on it. Now choose to remove the toolbar. You will get a prompt to confirm if you really want to do away with the toolbar.

•Step 4: When the toolbar is removed, restart your machine.

In case you are facing problems from the toolbar and cannot remove it even after going through the aforementioned steps, try opting for the online computer repair services. Such services offer you all the tech support needed to get rid of your computer problems.

Thursday, February 17, 2011

How to Fix Cyclic Redundancy Check Error

The cyclic redundancy check (CRC) error is an error message that is visible on your computer screen when your PC reads corrupt data. The error happens when your machine tries to read data from a storage media that is damaged like a hard drive, DVD or CD.

CRC error may also happen due to dust accumulation on DVD or CD. If your CD has a scratch on it, you might have to face a CRC error message. Now how do you fix the problem?

Tip 1: Before you open a file, check whether it has been completely downloaded, because a file that is not downloaded completely may cause CRC error.

Tip 2: A downloading manager will be good to fixing this kind of error, since it keeps track on the downloading process and lets you know when the process is complete.

Tip 3: If you are copying the file from your hard drive, you can run a scan disk program for troubleshooting errors that are related to your hard drive.

Tip 4: Verify all the connections to your computer for decoding the problem; remember, defective connections between the hard drive and the computer may cause the CRC error message to occur.

For fixing cyclic redundancy check error, the underlying cause must be detected. The afore-mentioned steps should help you; in case you are still facing problems, you can ask for online computer repair services for offering you remote tech support in this regard.

Monday, February 14, 2011

How to Open Torrent Files for Downloading Stuff

Torrent files have the extension of ‘.torrent’ and are found on the internet. You must have the ‘Torrent Client’ software installed in your computer. This software enables you to get information on the down loadable file contents and also allows tracking other clients that are sharing those files.

A torrent file gives you information about trackers which are following up those file locations. In short, a torrent file will give you all the information you need on the computers across the world having the data you require.With the software installed, you can open a torrent file easily. The software is easily available if you search on Google. You can also find other popular software programs such as Azures and u torrent.

Search for the data that you want to download; if it is available, then the torrent file will appear in the search results. For knowing if the data is authentic, you should go through the comments about the torrent. Once you have installed the bit torrent client, a window will open and ask for your permission in opening the torrent file using the torrent client.

You should click OK and select the location for the files on your hard drive. Now the download of your desired file will start. Note that downloading copyrighted material is illegal; download only stuff that’s in the public domain.

If you still have problems, you can ask for tech support from online computer repair service providers.