Pages

Latest Video

Monday, June 13, 2011

How to Disable Tag Suggestion Feature in Facebook

 FacebookIf you use Facebook often and do not want its Tag Suggestion feature, you may disable it yourself or may contact a computer repair service for help. When the Facebook user uploads a photo in his/her profile, the social networking site enables the tag suggestion. The feature recognizes the faces of your friends in the picture and automatically tags the photos. The feature is turned on for all Facebook users by default. For disabling the feature in your Facebook account, follow some simple steps.

• Step 1: Go to the Facebook website and login to your account.
• Step 2: Now click on the tab labeled Account and go to Privacy Settings link which is available at the top right side corner.
• Step 3: On the Privacy Settings page, the Facebook user must click on the link that is called Customize Settings; this link is located at the bottom left side.
• Step 4: Now the user must click on the button called Edit Settings which is visible against the option Suggest photos of me to friends.
• Step 5: A window will pop up and the user has to choose the Disable option and then click Okay button for saving settings.

This will stop you from being automatically tagged in your friends’ uploaded photos. If you are not confident in doing this yourself, get the services of a remote PC support provider.
Wednesday, June 8, 2011

How to Share Your Libraries in Windows 7

Windows 7If you are a Windows 7 user, you may choose to share your libraries with the other network users. The operating system enables the users to share libraries with read/write access or read only access. There are steps to achieving the task and if you are not confident on achieving the task, then seek the services of an online technical support provider.

• Step 1: The user must open Windows Explorer.

• Step 2: Now you must choose a library that you want to share with the other users who are on the network.

• Step 3: In the toolbar, the user must click on Share With and then select Homegroup (Read) or maybe Homegroup (Read/Write). When you choose Homegroup (Read), the other users on the network will gain read only access to the files on your chosen library. Now if you select Homegroup (Read/Write), the other users on network can enjoy both read and write access to the files in the library that has been selected.

If in future you do not want the particular library files to be accessed by the other users on the network, you have to un-share the library. In this case, the user must follow the aforementioned steps and then choose Nobody option from the menu. There are many remote PC repair services that can help you with this and other computer related issues.

Wednesday, June 1, 2011

Steps to Show Games as Menu in Start Menu of Windows 7

Do you love playing games on your PC? Do you switch on your PC mostly for playing your favorite games? Well, if you have such an addiction, wouldn’t it be good to have the games shown as menu in the Start menu? You would then get direct access to your games and start playing. All Windows 7 operating system users can choose to go right to the Games category for running the games fast. Gone are the days when users had to go to the Games folder and choose a game for playing.

For showing games as menu in start menu, you have to follow some steps or seek the services of an online technical support provider.

• Step 1: Right click on the Start menu and choose “Properties” from the menu that appears.

• Step 2: Now the user has to choose the tab labeled “Start Menu”, in case that tab is not already selected.

• Step 3: Look for the button called “Customize” under the Start Menu tab and click on it.

• Step 4: Now scroll down the list of options and select the option “Display as menu” which is found under the Games category.

• Step 5: Now click on “OK” for saving the settings.

If you still have problems, contact a remote PC support provider for assistance immediately.

Friday, May 27, 2011

Turn Off Windows Defender in Windows 7: Lean How

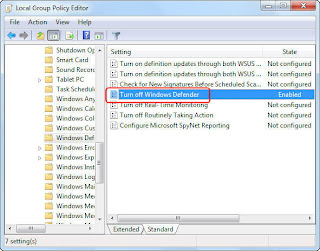
Local Group Policy EditorIf you are using Windows 7 operating system, know that Windows Defender is pre-installed in the operating system. Windows Defender is actually a utility that is used for scanning and removing spyware as well as malware that may get into Windows from the internet. However, users often feel the need to disable Windows Defender as they do not want it to run along with other installed anti-spyware programs. You may turn off the utility yourself or contact a Windows repair service for assistance.

• Step 1: Press the Windows key and the R key together for opening the Run dialog.

• Step 2: Now type “gpedit.msc” in the dialog box and then hit the Enter key.

• Step 3: When the Local Group Policy Editor opens, the user must navigate to “Computer Configuration” and then go to “Administrative Templates”.

• Step 4: Now the user clicks on Windows Components and then goes to Windows Defender.

• Step 5: On the right side pane, the user will find a setting labeled “Turn Off Windows Defender”. The user has to click on this setting and choose “Enabled” and then click “OK”.

• Step 6: Finally the user must close the Local Group Policy Editor window.

These steps should help you turn off Windows Defender; if you still have problems, contact an online technical support service immediately.

Tuesday, May 24, 2011

Steps to Change the Sound Schemes in Windows 7

Sound SchemesWhen you are using the Windows 7 operating system, know that you may change the sound schemes, if you deem necessary. When the user logs on to windows and opens a window or closes a window, or maybe some error has occurred, there is a sound played by Windows. Windows 7 comes with several sound sets that the user may change accordingly to his/her choice. There are many steps that the user needs to follow for changing the sound schemes, or he/she may also seek the services of a remote PC support provider.
• Step 1: In the system tray, identify the speaker icon and right click on it.

• Step 2: Now the user must select the “sounds” option from the right click menu

• Step 3: In the sound window that is open, the user has the option to choose a sound scheme from the drop down list

• Step 4: After the user selects a sound scheme, the sounds may be tested for different events by using the “Test” button. Make sure you select an event in the event list and then click the “Test” button

• Step 5: When you are satisfied, click on “OK” for saving the settings. If you do not want to have any sounds, you may select the “No Sounds” scheme.

In case you are having problems, contact an online computer repair company for assistance.

Thursday, May 19, 2011

How to Add a Folder to Favorites Group in Windows 7

Favorites Group Folder in Windows 7If you feel the need of a folder often when working on your Windows 7 operating system, you may choose to have the folder in the Favorites groups, so that you may access it easily without wasting anytime in locating it every time. The Favorites group is visible at the top right side navigation pane of the Windows Explorer. Follow the steps or get a computer repair service to do the task for you.

• Step 1: Open the Windows Explorer and then navigate to the folder that you want to add to the Favorites group and select it.

• Step 2: Now you have to drag the selected folder to the Favorites group

• Step 3: After you have dragged the file, you will find a tooltip appear that says “Create link in Favorites”. As soon as you see the tooltip, release the mouse button and you will find the link created in the Favorites group.

If you think that you do not want to access the folder frequently, you can also remove the link. In this case, under the Favorites group you have to right click on the folder link and then select the “Remove” option. If you find following the steps complex and have issues, you can immediately contact an online technical support service.

Sunday, May 8, 2011

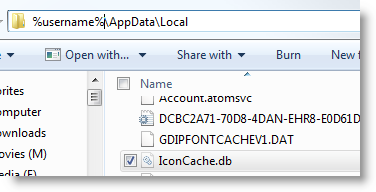
How to Rebuild Icon Cache in Windows XP

If you are using the Windows XP operating system, know that sometimes the icon cache in the available in Windows gets corrupt. Know that whenever an icon is accessed by Windows, the icon is cached for reference in future. Afterwards, the image gets read from the cache instead of being read from the icon definition itself. By default the icon cache is able to store 500 icons. When the icon cache gets corrupted in Windows, you find the wrong icons displayed for the many file types.

This issue can be solved by restarting the computer in most of the cases. The issue can be solved by also not having to restart your computer system. There are some steps that you have to follow or you may also choose to contact a remote PC support provider for help.

• Step 1: Press the Windows logo key and the “R” alphabet key on your keyboard to open the Run dialog.

• Step 2: Now type “cmd” on the Run dialog box and then hit the Enter key. This will open the command prompt window.

• Step 3: In the command prompt window, you have to type some commands. Note that you have to press enter after typing each line. You have to type the following:
taskkill /f /im explorer.exe attrib -H "%userprofile%\Local Settings\Application Data\IconCache.db" del "%userprofile%\Local Settings\Application Data\IconCache.db" explorer.exe The aforementioned steps should rebuild the icons cache and also restart the Windows Explorer.
If you still face problems with the icons, you may seek online computer repair for assistance.