Pages

Latest Video

Friday, May 27, 2011

Turn Off Windows Defender in Windows 7: Lean How

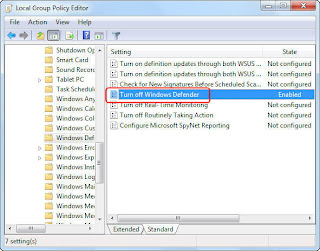
Local Group Policy EditorIf you are using Windows 7 operating system, know that Windows Defender is pre-installed in the operating system. Windows Defender is actually a utility that is used for scanning and removing spyware as well as malware that may get into Windows from the internet. However, users often feel the need to disable Windows Defender as they do not want it to run along with other installed anti-spyware programs. You may turn off the utility yourself or contact a Windows repair service for assistance.

• Step 1: Press the Windows key and the R key together for opening the Run dialog.

• Step 2: Now type “gpedit.msc” in the dialog box and then hit the Enter key.

• Step 3: When the Local Group Policy Editor opens, the user must navigate to “Computer Configuration” and then go to “Administrative Templates”.

• Step 4: Now the user clicks on Windows Components and then goes to Windows Defender.

• Step 5: On the right side pane, the user will find a setting labeled “Turn Off Windows Defender”. The user has to click on this setting and choose “Enabled” and then click “OK”.

• Step 6: Finally the user must close the Local Group Policy Editor window.

These steps should help you turn off Windows Defender; if you still have problems, contact an online technical support service immediately.

Tuesday, May 24, 2011

Steps to Change the Sound Schemes in Windows 7

Sound SchemesWhen you are using the Windows 7 operating system, know that you may change the sound schemes, if you deem necessary. When the user logs on to windows and opens a window or closes a window, or maybe some error has occurred, there is a sound played by Windows. Windows 7 comes with several sound sets that the user may change accordingly to his/her choice. There are many steps that the user needs to follow for changing the sound schemes, or he/she may also seek the services of a remote PC support provider.

• Step 1: In the system tray, identify the speaker icon and right click on it.

• Step 2: Now the user must select the “sounds” option from the right click menu

• Step 3: In the sound window that is open, the user has the option to choose a sound scheme from the drop down list

• Step 4: After the user selects a sound scheme, the sounds may be tested for different events by using the “Test” button. Make sure you select an event in the event list and then click the “Test” button

• Step 5: When you are satisfied, click on “OK” for saving the settings. If you do not want to have any sounds, you may select the “No Sounds” scheme.

In case you are having problems, contact an online computer repair company for assistance.

Thursday, May 19, 2011

How to Add a Folder to Favorites Group in Windows 7

Favorites Group Folder in Windows 7If you feel the need of a folder often when working on your Windows 7 operating system, you may choose to have the folder in the Favorites groups, so that you may access it easily without wasting anytime in locating it every time. The Favorites group is visible at the top right side navigation pane of the Windows Explorer. Follow the steps or get a computer repair service to do the task for you.

• Step 1: Open the Windows Explorer and then navigate to the folder that you want to add to the Favorites group and select it.

• Step 2: Now you have to drag the selected folder to the Favorites group

• Step 3: After you have dragged the file, you will find a tooltip appear that says “Create link in Favorites”. As soon as you see the tooltip, release the mouse button and you will find the link created in the Favorites group.

If you think that you do not want to access the folder frequently, you can also remove the link. In this case, under the Favorites group you have to right click on the folder link and then select the “Remove” option. If you find following the steps complex and have issues, you can immediately contact an online technical support service.

Sunday, May 8, 2011

How to Rebuild Icon Cache in Windows XP

If you are using the Windows XP operating system, know that sometimes the icon cache in the available in Windows gets corrupt. Know that whenever an icon is accessed by Windows, the icon is cached for reference in future. Afterwards, the image gets read from the cache instead of being read from the icon definition itself. By default the icon cache is able to store 500 icons. When the icon cache gets corrupted in Windows, you find the wrong icons displayed for the many file types.

This issue can be solved by restarting the computer in most of the cases. The issue can be solved by also not having to restart your computer system. There are some steps that you have to follow or you may also choose to contact a remote PC support provider for help.

• Step 1: Press the Windows logo key and the “R” alphabet key on your keyboard to open the Run dialog.

• Step 2: Now type “cmd” on the Run dialog box and then hit the Enter key. This will open the command prompt window.

• Step 3: In the command prompt window, you have to type some commands. Note that you have to press enter after typing each line. You have to type the following:
taskkill /f /im explorer.exe attrib -H "%userprofile%\Local Settings\Application Data\IconCache.db" del "%userprofile%\Local Settings\Application Data\IconCache.db" explorer.exe The aforementioned steps should rebuild the icons cache and also restart the Windows Explorer.
If you still face problems with the icons, you may seek online computer repair for assistance.

Thursday, April 28, 2011

Steps to Hiding the Taskbar in Windows XP Automatically

Often while working on your Windows XP computer system, you may feel the need of getting more screen space, this is when you want to hide the Windows taskbar till you need it. The Windows CP system can be configured for automatically hiding the taskbar until it is required. The Auto-hide option can help in making the Windows taskbar disappear when not required. This will enable in giving the application you have open a lot more available screen space.

For turning off the Auto-hide option, you must follow some simple steps or look for online tech support.

Hiding the Taskbar in Windows XP• Step 1: Right-click on the taskbar and choose the “Properties” option from the menu that appears. This will open up the “Taskbar and Start Menu Properties” window.

• Step 2: Click on the “Taskbar” tab and then check the box that has been labeled “Auto-hide the Taskbar”

• Step 3: You also need to ensure that the box labeled “Keep the taskbar on top of other windows” is checked.

• Step 4: Now click on “OK” for saving the changes and then exit the properties window.

This should enable the taskbar to disappear. If you want the taskbar to be visible, you must move your mouse cursor to the bottom of the screen. If you do not want to hide the taskbar anymore, simply follow the above mentioned steps, and just uncheck the “Auto-hide the Taskbar” box. If you are still facing problems, you may contact an online computer repair service.

Thursday, April 21, 2011

How to Disable the Windows XP Error Reporting Feature

What do you think the error report sending feature is for? This is a feature that enables Microsoft in production of better stable software in future. The individual can decide if he/she wants to send the error reports or not. There are several steps to be followed if error reporting feature has to be disabled.

Disable Windows XP Error Reporting Feature• Step 1: Go to the Start menu and choose the “Properties” option for opening the System Properties window. You may also right click on the My Computer icon available on your desktop

• Step 2: Click on the “Advanced” tab

• Step 3: Now click on the button which is labeled as “Error Reporting”. You can find this button at the bottom right side of the System Properties window. You will get the Error Reporting window.

• Step 4: Now choose the “Disable error reporting” option. You may also tick the check box that says “But notify me when critical errors occur”

• Step 5: Click on OK for exiting the “Error reporting window” and then click on OK for a second time to exit the System Properties.

If you want to enable the error reporting feature later, you have to follow the same afore-mentioned steps and select “Enable error reporting” option instead of “Disable error reporting” option. If problems persist, you need to contact an online computer repair service for tech support.

Thursday, April 14, 2011

Tips to Install Driver for Updating Printer

If the printer that you are using is not functioning properly and needs the driver software to work properly, you have to download and install the latest driver for your device. Incompatible, corrupted and outdated printer drivers get the communication between the printer and the computer disrupted. You may have upgraded from one version of Windows to another, your printer might not be working because the current printer driver is not compatible with the upgraded version.

Updating Printer
You may use Windows Update for installing a driver. Set the Windows Update to download automatically as well as install the recommended updates. Search for a good driver on the website of the manufacturer. This step is essential only if your printer did not come with software that installs a driver or the Windows Update cannot get a driver for your printer.

• Step 1: Click on Start menu and in the search box type Update. Click Windows Update from the list of results.

• Step 2: Click on “Check for Updates” in the left pane. If there are available updates, make sure you click on the links for more information on each updates.

• Step 3: Look for updates for your printer on the “Select the updates you want to install” page. Click the driver that you want to install and then click on OK.

• Step 4: On the Windows Update page click on Install Updates. Type the password if you are prompted for an administrator password.

If you still face problems, contact an online PC repair service for technical support.